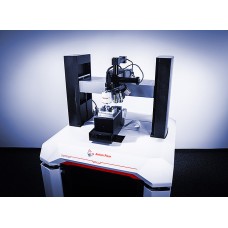
Nanoindentation Tester:
NHT3
- Measurement of hardness, elastic modulus, and other surface mechanical properties from nanometer to micrometer scale
- Immediate start of measurement after sample installation
- Easy and fast indenter exchange
- Force measurement up to 500 mN
The NHT³ nanoindentation tester is designed for measuring hardness, elastic modulus, creep, and other surface properties from the nanometer to the micrometer scale. Its force range from 0.1 mN to 500 mN provides maximum versatility. With the unique top surface referencing technique, an instrumented indentation measurement can be made immediately without waiting for thermal stabilization. The “Quick Matrix” indentation mode allows high throughput (up to 600 measurements per hour).
Key Features
Straightforward nanoindentation measurements
With Anton Paar’s intuitive software you can easily define and analyze each type of instrumented indentation measurement, from standard to highly advanced methods. The integrated microscope offers a very large magnification range so you can observe the sample’s surface and allows you to directly define the measuring position. Moreover, the indenter is fully protected from collision by the reference ring and the exchange of a measuring tip can be done in less than 2 minutes.
High accuracy and short time to measure
The unique design of the instrument integrates a top surface reference ring that follows the sample’s surface throughout the indentation measurement. This means the indentation depth is always directly measured with respect to the current surface position. Anton Paar’s nanoindentation tester is the only instrument with this unique feature, meaning NHT³ delivers accurate results and not error-prone software corrections. A further advantage of this technique is that you can immediately start your measurement after the sample installation without waiting hours for thermal stabilization.
High throughput with quick matrices
The fast measuring mode allows you to perform up to 600 measurements per hour with real indentation curves. Thanks to our referencing design, no thermal stabilization is needed, which allows you to install and immediately measure a high number of samples per day. With its user profiles, measurement protocols, multi-sample measurements, and customizable reporting, NHT³ has the highest throughput on the market.
Additional dynamic mechanical analysis (DMA) with “Sinus Mode”
Sinus Mode enables you to perform DMA analysis in order to study the evolution of mechanical properties over depth (HIT, EIT vs. depth) and characterize the sample’s viscoelastic properties (E', E'': storage and loss moduli, tan δ). Sinus Mode offers additional features, such as quick indenter calibration and stress-strain analysis.
Technical specifications :
| Maximum load [mN] | 500 |
| Load resolution [nN] | 20 |
| Load noise floor [rms] [μN] | ≤0.5 |
| Loading rate [mN/min] | Up to 10000 |
| Depth range [μm] | 200 |
| Depth resolution [nm] | 0.01 |
| Depth noise floor [rms] [nm] | ≤0.15 |
| Data acquisition rate [kHz] | 192 |
| Options | |
| Liquid testing | ✔ |


